


OnlyFans has become the go-to platform for content creation and earning revenue. To get started on OnlyFans, you need to verify your identity with a perfect ID photo.
This guide will help you take the perfect ID photo for OnlyFans.
When taking an ID photo for OnlyFans, you want to make sure it is high-quality and meets the platform’s guidelines. According to OnlyFans guidelines, the photo should be clear, in color, unfiltered, and unedited.
You should also avoid wearing hats, sunglasses, or anything that obscures your face. It is recommended to use a plain background, such as a white wall, and good lighting to bring out the details.
To ensure the photo meets the criteria, take it with a high-resolution camera and check it on a computer screen, as some aspects may not be visible on a phone screen. With these tips, you can take the perfect ID photo for OnlyFans and start creating content and earning revenue.
Check out this Youtube video to learn how to properly take and upload your ID photo for your OnlyFans account, ensuring that you can receive payment and utilize the social media platform to its fullest potential!
Understanding OnlyFans Verification Process
OnlyFans is a content subscription service mainly used by models, influencers, and adult entertainers to monetize their content. The platform offers two types of accounts: free and paid subscriptions.
Paid subscriptions can only be accessed by users who have successfully gone through the verification process.
The verification process on OnlyFans requires you to submit a valid photo ID, and it is typically completed in 24-48 hours. The platform strictly adheres to AML/KYC (Anti-Money Laundering/Know Your Customer) regulations to ensure the safety and security of all its users.
To be eligible for OnlyFans verification, you must meet the following requirements:
– Be at least 18 years of age
– Have a valid government-issued photo ID
– Have a clear headshot or selfie for facial recognition purposes
– Have a bank account or payment method to receive revenue
Once your verification is approved, you can start earning revenue through paid subscriptions and other paid content on the platform. It is essential to keep in mind that OnlyFans takes a 20% cut of all earnings made by creators on the platform.
How to take the Perfect ID Photo for OnlyFans
An ID photo is a crucial requirement for any OnlyFans content creator. It is used for verification purposes and to make sure that your account is secure.
Taking a good ID photo is key in avoiding any delays in the verification process.
Why is a good ID photo important?
A good ID photo is important to ensure that your account gets verified quickly. It is the only way for OnlyFans to determine your identity and make sure that your account is secure.
Without a good ID photo, you may experience delays in the verification process or, worse, have your account rejected.
What are the best practices to follow for taking an ID photo?
To take the perfect ID photo for OnlyFans verification, follow these best practices:
- Make sure you are in a well-lit area.
- Take the photo in front of a plain background.
- Face the camera directly and make sure that your face is fully visible.
- Remove any glasses or hats that may obstruct your face.
- Take off any heavy makeup or accessories that could alter your appearance.
- Make sure to hold your ID and take a clear photo of it.
By following these best practices, you can ensure that your ID photo will meet OnlyFans’ verification standards.
What are the Dos and Don’ts for taking an ID photo for OnlyFans verification?
Here are some Dos and Don’ts for taking an ID photo for OnlyFans verification:
Dos:
- Do ensure that your photo is clear and in focus.
- Do make sure that the photo displays your entire face and ID clearly.
- Do take the photo in a well-lit area.
- Do use a plain background for the photo.
Don’ts:
- Don’t use filters or editing tools to modify the photo.
- Don’t take the photo in a poorly lit area or with a busy background.
- Don’t obstruct your face with hats, large accessories, or heavy makeup.
- Don’t cover any essential information on your ID.
Remember, a good ID photo is key in avoiding any issues and delays in your verification process. By following these tips, you can ensure that your OnlyFans account is secure and verified.
Tools for Taking the Perfect ID Photo
Taking a perfect ID photo requires the right tools. To start, you will need a smartphone with a good camera.
You can easily take a selfie by flipping the phone’s camera to face you and using the front camera. Use natural lighting as much as possible to ensure that the photo comes out clear and well-lit.
If the lighting is poor, use a lamp or any other light source as needed. You can also use a tripod to keep your phone steady and avoid blurry photos.
Finally, make sure to use a plain background, ideally white, to ensure that the focus is on your face. With these simple tools, you can take the perfect ID photo for OnlyFans.
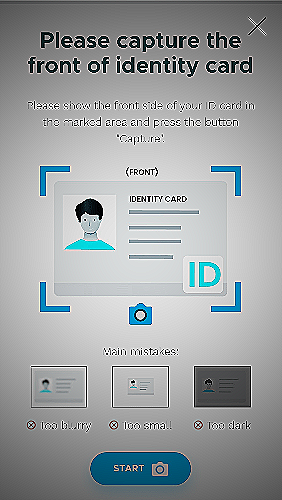
Common Mistakes to Avoid When Taking ID Photo for OnlyFans
When taking ID photos for OnlyFans, there are some common mistakes that people tend to make. One of the most common mistakes is not following the guidelines that OnlyFans provides for ID photos.
These guidelines include things like making sure the photo is clear and in focus, ensuring that the entire face is visible, and that there are no obstructions like hats or sunglasses. Another mistake that people make is using filters or editing tools on their ID photos.
OnlyFans requires that ID photos are unedited and free from any filters or alterations.
To avoid these mistakes, make sure to read and follow the guidelines that OnlyFans provides for ID photos. Additionally, it’s important to take the photo in good lighting with a neutral background.
Avoid using any filters or editing tools on the photo, and double-check to make sure the entire face is visible and free from any obstructions.
[important message=’UmVtZW1iZXIsIGZhaWxpbmcgdG8gZm9sbG93IHRoZSBndWlkZWxpbmVzIGNhbiByZXN1bHQgaW4geW91ciBhY2NvdW50IGJlaW5nIHN1c3BlbmRlZCBvciBkZWFjdGl2YXRlZC4gU28sIGl0J3MgaW1wb3J0YW50IHRvIHRha2UgdGhlIHRpbWUgdG8gZ2V0IHlvdXIgSUQgcGhvdG8gcmlnaHQgdGhlIGZpcnN0IHRpbWUu’ color=’I2RkMzMzMw==’]

Tips for Retaking the ID Photo
If your ID photo is rejected when submitting it to OnlyFans, don’t worry as you can retake it. The platform allows you to resubmit your ID photo as many times as necessary until it is accepted.
Here are some tips and tricks to follow when taking a new ID photo:
1. Good lighting – Make sure to take the photo in a well-lit area to ensure that your face is clearly visible and there are no shadows.
2. Clear background – Choose a neutral background that won’t distract from your face and is free from clutter.
3. Follow the guidelines – OnlyFans has specific guidelines for their ID photos, including avoiding headwear and glasses.
Make sure to follow these guidelines to avoid having your photo rejected again.
4. Check the resolution – The photo should be clear and in focus, with no obvious blurring or pixelation.
5. Focus on your face – The photo should be a headshot, with your entire face in the frame.
Make sure to keep your face centered and looking straight at the camera.
By following these tips, you can increase your chances of having your ID photo accepted by OnlyFans.
How to Submit your ID Photo on OnlyFans
To submit your ID photo on OnlyFans, follow these steps:
1. Log in to your OnlyFans account
2. Click on your profile icon
3. Click on “Settings”
4. Click on “Personal Details”
5. Click on “Add ID”
6. Choose the type of ID you’ll be submitting and follow the instructions to upload it
7. Once your ID is uploaded, click on “Submit for Review”
8. Wait for OnlyFans to verify your ID
The verification process typically takes up to 24 hours. If your ID is not approved, you’ll be notified and prompted to submit a different form of ID.
Make sure that your ID photo is clear and up-to-date, and that it matches the information on your OnlyFans account.
Frequently Asked Questions
How can I verify my identity on OnlyFans if I don't have a government-issued ID?
Can I use my passport as a valid ID for OnlyFans verification?
What to do if my ID photo was rejected multiple times?
Conclusion
To take the perfect id photo for only fans, one must ensure that the photo is clear, high-quality, and shows the subject’s face as well as their id. It’s crucial to follow the guidelines provided by only fans, including using a neutral background and avoiding filters and alterations.
By following these tips, individuals can increase their chances of getting verified on only fans on the first try.
Remember, getting verified on only fans is essential for those looking to monetize their content on the platform. By providing a valid id and taking the perfect id photo, individuals can ensure that their accounts are secure and that their audiences can trust and engage with their content.
For more tips and tricks on how to take the perfect id photo for only fans, individuals can refer to various online resources, including blogs and forums, to learn from the experiences of others and get expert advice. Investing time and effort in taking the perfect photo can pay off in the long run, leading to more engagement, followers, and earnings on the platform.
Remember, only fans is a popular platform with millions of users worldwide, so it’s essential to stand out from the crowd. By taking the perfect id photo, individuals can increase their chances of success and achieve their goals on the platform.
So, apply these tips, practice taking your id photo, and get ready to become a successful only fans content creator!
References
- How can I get verified on OnlyFans?
- Common Mistakes in Taking Passport Photo and How to Avoid It
- How to Take Your Own Passport Photo


